Pounamu Carving Process
I am a beginning pounamu carver and am very much enjoying the challenge and joy of creation.
QUICK! Buy one before I get really good and start charging higher prices.
Shop Now!
The stones I use to make these pounamu for sale were collected legally from beaches on the West Coast of the South Island. The collector cleansed and blessed each pounamu stone after collection. This process started with laying it on mother earth for a 24-hour period. The collector infused love and the intention to bring healing into it and asked mother earth to assist in this. He blessed it with a munay-ki shamanic ritual. This infuses love and asks the stone to be in its highest form and highest power.
And if you have a broken pounamu or a pounamu that needs a new lashing and/or binding, contact me to receive a free quote for pounamu repair.
Shop for Pounamu to Buy
Pounamu Carving Process
Have you ever wondered: Why are pounamu so expensive?
If so, you’ve probably guessed that it’s because of the amount of time (and expertise) it takes to create a pounamu taonga (treasure).
First, you take the rough pounamu stone and slice it the thickness you want. Then you cut it to the shape you want. Sometimes this means simply rounding the edges but at other times requires intricate cutting. And pounamu is a hard stone, not soft. Yep, it takes a lot of work.
Drilling comes next for me. That takes nearly as much time as cutting the stone, and I have to resharpen my drill bits (and buy new ones) quite often. As I said, pounamu is hard stone.
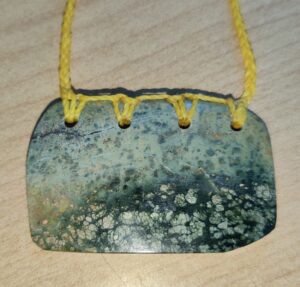
Some necklaces take just one hole, but others require two or more holes, and sometimes grooves as well. It depends on the type of lashing I want to apply to the stone (how the cord attaches to the pounamu).
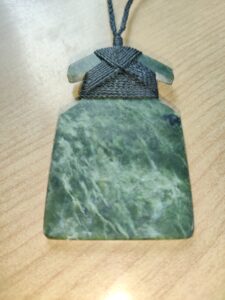
Now that the pounamu is the shape I want, it needs to be smoothed — smooth the edges of the pounamu and the flat surfaces too of course. I use sandpaper for most of this work, and you can probably imagine how long it takes to sand pounamu smooth.
For smoothing pounamu, I first use 80 grit sandpaper to smooth the cutting-blade marks. Then 240 grit, then 400 grit, and that’s where many pounamu carvers stop smoothing their pounamu. But I go to 600 grit. And finally, polish the pounamu taonga to ready it for sale.
The last step is lashing/binding the pounamu and then making the necklace. That’s wrapping and braiding cord to make the necklace.
That’s basically the work for carving pounamu.
I then wear it for at least 24 hours to ensure it sits right around the neck (passing my peace to the stone while I wear it).